Time Lapse Video Camera Best Practice for Construction
Filming a Time Lapse Video is a unique way of documenting the key milestones of your construction project, bringing it to life in a short-form video format.
There are a number of reasons as to why construction sites should install time lapse video cameras, mostly due to the company benefits related to them. This includes increased PR, marketing and branding opportunities, and engagement with your teams and clients.
But a time lapse video is only as effective as the footage it captures, and many environmental factors can impact the quality of your final video.
Why Should Construction Companies Use Time Lapse Cameras?
Having previously outlined the many benefits associated with showcasing your construction projects with a time lapse video.
Below, we have highlighted some of the key benefits in a comprehensive list:
Sales and Marketing Benefits: Video marketing is one of the most effective ways to raise your business profile. The average consumer watches more than 100 minutes of video online every day. Time lapse videos are short, eye-catching and can help you win more business.
Internal Engagement: Time lapse videos document all the critical milestones of your projects, allowing you to celebrate your teams' success at regular intervals and once the project is complete.
Stakeholder Engagement: Time lapse videos chart your progress, and your customers and investors are likely to be keen to know how the project is going. Keep them up to date with regular time lapse videos.
Community Engagement: Construction projects can negatively impact the surrounding communities due to increased traffic, noise, dust pollution and potential disruption to travel and transport. However, most construction projects bring lasting value to communities. A time lapse video can help companies highlight their construction's positive impact and the considerate way they work.
As the USA's #1 supplier of Time Lapse Video Cameras, we’ve formed our best practice guidance for time lapse video cameras on construction sites to ensure the most optimal results.
Our Best Practice Guide to Construction Time Lapse Video Cameras
Within this guide, we offer a best practice guide to construction time lapse video cameras, understanding what to consider, why this matters, and how to best optimize your results.
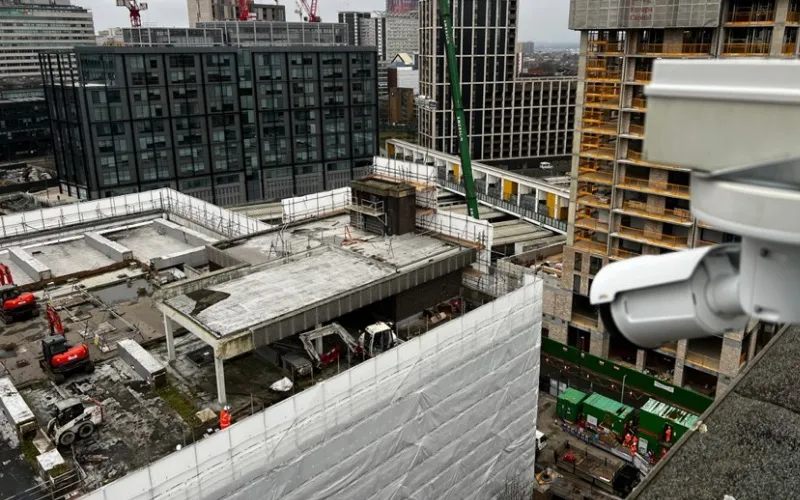
Consider the Field of View
Your first consideration should be which position and/or angle will give you the best overview of the whole site. This will likely involve installing the camera at a high vantage point to get the maximum coverage of the site as it develops.
Consider at the outset of your project, whether you will need to move the camera as the project develops. If you're building a high-rise structure, will your original camera position still work as the project nears completion?
The camera's position may also be compromised by other factors, too, such as tall machinery being utilized onsite that could block the camera's field of view.
Additionally, you'll need to decide whether one camera will be enough to give you the best result.
It may be that large sections of work occur far away from the camera or even out of shot, so for this, multiple cameras are more effective and ensure complete coverage of your site.
Likewise, you may wish to consider an internal and external camera to enhance your final results.
In the video below, WCCTV provided the client internal and external timelapse filming services to deliver a full project overview.
Take Precautions to Avoid Glare
Sun glare can have a detrimental impact on the quality of your footage, and, depending on the angle of your camera, it can potentially obscure large portions of daily activity.
This places your whole time lapse video at risk.
Factor the sun's arc throughout the project (remembering that it will change through the seasons) and try to angle your cameras as best as possible to help mitigate against glare.
Regularly reviewing your footage will also help in determining whether you have installed the camera in the most suitable location to minimize the sun's glare.
Ensure Stable Installation
Wind can also have a damaging impact on your time lapse video project. Cameras that are not firmly secured can shake/move on windy days, severely damaging video quality.
For this reason, we advise against installing your cameras high up on long poles, attaching them to unsecured metalwork, or any unsecured surface at all.
Wherever you install the camera, ensure it is firmly secured to prevent wind or vibration movement year-round.
Consider Varying Weather Conditions: Rain and Debris
Rain can dampen more than your spirits; it can also ruin crucial parts of your time lapse video. Rain droplets can pool the camera's lens, causing images to become blurry and unusable.
To mitigate this as best as possible, you should fit your time-lapse cameras with a rain shield/guard. This will minimize the likely impact of an occurrence that is largely unavoidable.
The same can be said for dust and debris on your sites. Wind can pick up dust particles and deposit them on the lens of your cameras.
In this instance, a simple wipe of the camera lens is enough to prevent any major impact on your video, but be extremely careful not to nudge the camera's position when cleaning.
Think About the Video’s Framing
You want your finished time lapse video to be as visually appealing as possible and grab the attention of your potential clients when they are browsing your websites or social media.
Framing your image in a way that is easy on the viewer's eye can critically impact how much attention your video gets.
The guide below explains how to apply 'The Rule of Thirds' to frame your video best.
Test and Check Your Time Lapse Camera
Testing and checking is the main way to mitigate against all of the issues listed above.
Review the footage you have gathered, ideally weekly, to highlight any adjustments you need to make to ensure the project isn't spoiled by camera movement or environmental factors.
If your project is very short, it may be advisable to check every other day.
How Long Should a Construction Time Lapse Video Be?
It is suggested that the ideal length of a marketing video is no longer than 5 minutes and that a perfect length is around 2-3 minutes.
When it comes to time lapse videos, these rules are not as hard and fast, as project lengths can vastly differ.
When our marketing experts are producing videos for clients, they follow several guiding principles to ensure no video is ever longer than it needs to be. Below outlines their methodology for this:
Project Length: The frequency with which we capture video images for a two-month construction project is vastly different to that of a two-year project. On a two month project, we would look to capture an image at least every 5 minutes, whereas on a two-year project it would be more like every 15 minutes.
Working Hours: We will consider whether the client is working outside of 'normal hours' such as evenings, weekends and over bank holidays. This will impact our recording schedule and the number of images we take in a day.
Type of Project: Over the years, we have learned that we only have one shot at getting time lapse recordings right. This is especially true for demolition projects, the client can't very well put the building back up again if our cameras miss it. When it comes to demolition projects, we typically record much more frequently, as you will be amazed how quickly a building can come down.
Why Choose WCCTV’s Construction Time Lapse Cameras
With over 20-years of experience working with the construction industry, providing an all-in-one video solution for security, remote project management and Time Lapse Video.
We will work in partnership with you during your projects to ensure we capture your project's key milestones and deliver your perfect Time Lapse Video.
As part of our full post-project video editing service, we include text overlay, music and removing any periods of inactivity so that you have an incredible highlights package to share across all your digital channels.
You'll also be given access to our time lapse portal so that you can download your progress videos at the push of a button and even embed the live video onto your website.
For more information on our Time Lapse Video cameras, get in touch today.